A useful back session does not need five versions of the same row. Start by naming what each exercise does in the session. If two exercises have the same job, keep both only when you can explain why.
This page is narrower than Forte's best barbell workouts guide. That live article owns complete barbell sessions. This one is an audit for rows and other pulls.
Start with the direction, not the exercise name
A row brings the load towards you across the body. A pulldown or pull-up brings it down from overhead. Those labels help you see whether your list covers more than one direction. They do not mean each exercise belongs to only one muscle.
Give every pull a job
Give every pull in the session one of these three jobs, then read the question in its row. A label is a planning tool, not a claim that an exercise trains only one muscle.
| Job | Current Forte example | Question to ask |
|---|---|---|
| Horizontal pull | Bent Over Barbell Row or Bent Over Dumbbell Row | Why would a second row improve this session rather than repeat it? |
| Vertical pull | Wide-Grip Lat Pulldown | Does the session already include another pull from overhead? |
| Supporting work | Read the programme's exact exercise | Is it a main pull, or smaller rear-shoulder or scapular work? |
What the answer decides
- Keep it. You can write down the reason. Equipment, loading, comfort, or an instruction in the programme itself.
- Remove it. You cannot. A second pull with the same job and no written reason is the duplicate this audit exists to find.
Source note: the examples are current Forte exercise pages. The horizontal and vertical labels organise a session; no study on this page ranks one pull above another.
Use one row and one vertical pull as the first check
Forte has current public pages for two row variations and a Wide-Grip Lat Pulldown. Pick the row that matches your equipment, then check whether the session also includes a pull from overhead. These are coverage examples, not a complete back workout.
Exercise
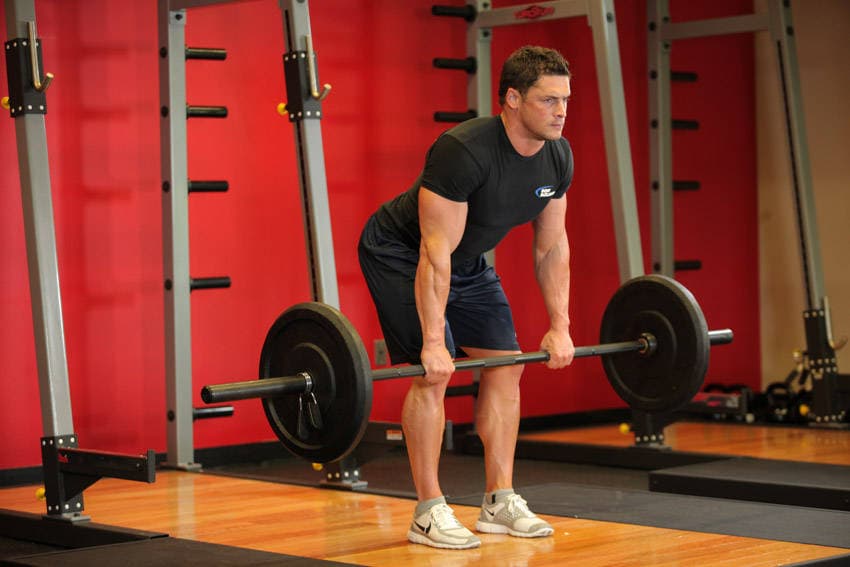
Bent Over Barbell Row
Muscles worked
Setup: Holding a barbell with a pronated grip (palms facing down), bend your knees slightly and bring your torso forward, by bending at the waist, while keeping the back straight until it is almost parallel to the floor. Tip: Make sure that you keep the head up. The barbell should hang directly in front of you as your arms hang perpendicular to the floor and your torso. This is your starting position.
Now, while keeping the torso stationary, breathe out and lift the barbell to you. Keep the elbows close to the body and only use the forearms to hold the weight. At the top contracted position, squeeze the back muscles and hold for a brief pause. Then inhale and slowly lower the barbell back to the starting position. Repeat for the recommended amount of repetitions.
Coach's tip
- Initiate the movement by driving your elbows back and up.
- Squeeze your shoulder blades together at the top of the movement.
- Keep your core braced and torso stationary throughout the lift.
- Avoid letting the weight pull you forward; maintain a strong, stable hip hinge.
Exercise
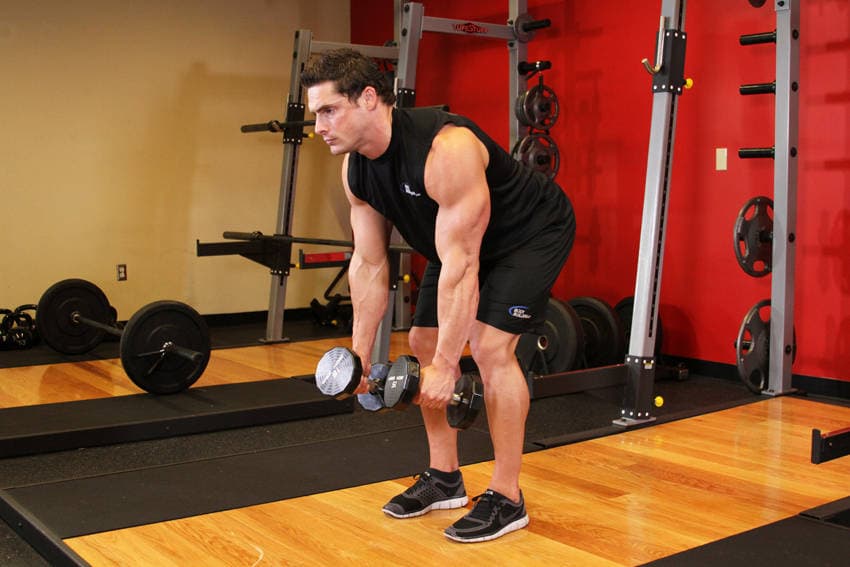
Bent Over Dumbbell Row
Muscles worked
Setup: With a dumbbell in each hand (palms facing your torso), bend your knees slightly and bring your torso forward by bending at the waist; as you bend make sure to keep your back straight until it is almost parallel to the floor. Tip: Make sure that you keep the head up. The weights should hang directly in front of you as your arms hang perpendicular to the floor and your torso. This is your starting position.
While keeping the torso stationary, lift the dumbbells to your side (as you breathe out), keeping the elbows close to the body (do not exert any force with the forearm other than holding the weights). On the top contracted position, squeeze the back muscles and hold for a second. Slowly lower the weight again to the starting position as you inhale. Repeat for the recommended amount of repetitions.
Coach's tip
- Initiate the movement by squeezing your shoulder blades together.
- Keep your elbows close to your torso throughout the movement.
- At the top of the movement, pause and consciously contract your back muscles.
- Maintain a tight core and neutral spine; avoid rounding your back.
- Focus on pulling with your back, not just your arms.
Exercise
Wide-Grip Lat Pulldown

Muscles worked
Setup: Sit down on a pull-down machine with a wide bar attached to the top pulley. Make sure that you adjust the knee pad of the machine to fit your height. These pads will prevent your body from being raised by the resistance attached to the bar.
Grab the bar with the palms facing forward using the prescribed grip. Note on grips: For a wide grip, your hands need to be spaced out at a distance wider than shoulder width. For a medium grip, your hands need to be spaced out at a distance equal to your shoulder width and for a close grip at a distance smaller than your shoulder width. As you have both arms extended in front of you holding the bar at the chosen grip width, bring your torso back around 30 degrees or so while creating a curvature on your lower back and sticking your chest out. This is your starting position. As you breathe out, bring the bar down until it touches your upper chest by drawing the shoulders and the upper arms down and back. Tip: Concentrate on squeezing the back muscles once you reach the full contracted position. The upper torso should remain stationary and only the arms should move. The forearms should do no other work except for holding the bar; therefore do not try to pull down the bar using the forearms. After a second at the contracted position squeezing your shoulder blades together, slowly raise the bar back to the starting position when your arms are fully extended and the lats are fully stretched. Inhale during this portion of the movement. Repeat this motion for the prescribed amount of repetitions.
Coach's tip
- As you have both arms extended in front of you holding the bar at the chosen grip width, bring your torso back around 30 degrees or so while creating a curvature on your lower back and sticking your chest out. This is your starting position.
- As you breathe out, bring the bar down until it touches your upper chest by drawing the shoulders and the upper arms down and back. Tip: Concentrate on squeezing the back muscles once you reach the full contracted position. The upper torso should remain stationary and only the arms should move. The forearms should do no other work except for holding the bar; therefore do not try to pull down the bar using the forearms.
- After a second at the contracted position squeezing your shoulder blades together, slowly raise the bar back to the starting position when your arms are fully extended and the lats are fully stretched. Inhale during this portion of the movement.
The two rows are horizontal pulls. The pulldown is a vertical pull. Equipment and setup differ, but the labels are only a way to organise the session. They do not prove that one exercise is best for every reader.
Check the pattern against a current Pull session
PPL currently combines Barbell Rows and Seated Cable Rows with Weighted Pull-ups on one Pull day, then uses other row and pulldown variations later in the week. That is a catalogue example of both directions in one programme, not a template to copy into a different plan.
Programme
PPL (Push Pull Legs)
The classic 6-day Push Pull Legs split. Train each muscle group twice per week with optimal volume distribution. Push day for chest, shoulders, and triceps. Pull day for back and biceps. Leg day for lower body. The gold standard for building muscle.
- Train each muscle 2x/week
- Optimal volume distribution
- Progressive overload focus
- Balanced development
The PPL page is the verified destination for this article. It is not evidence that every reader should run six days a week, and it is not permission to rewrite a Pull session from memory.
A simple duplicate check
- Write one plain-English job beside every exercise.
- Circle repeated jobs.
- Keep a repeat only when equipment, loading, comfort, or the programme gives it a clear reason.
- Check that every link points to a current Forte entity before sharing the session.
Check the whole training week
A session can look tidy and still repeat work that already appears elsewhere in the week. Read the sessions before and after it. If another day already carries the row you want to add, write down why the extra exposure belongs. Do not use this page to guess what the programme intended.
The same rule works in reverse. A Pull session may look short because the programme spreads supporting work across other days. Counting exercise names without reading the week can make a deliberate plan look incomplete.
Equipment does not create a new job by itself
Changing from a barbell to dumbbells changes the setup and may change what you can load or control. It does not automatically give the second row a different purpose. If equipment is the reason, say what it solves for you and make sure the swap is allowed.
Keep the exercise name exact in your notes. "Row" is too broad when you later need to find the page, compare a session, or ask a coach about technique. The two verified cards above give you stable names and routes for that conversation.
If a movement causes pain, stop and get help from a qualified coach or healthcare professional. This audit cannot assess technique or injury.
Frequently asked questions
Are rows enough for a complete back session?
A row covers the horizontal-pull slot in this audit. Check the current programme for a vertical pull and for any supporting work before deciding the session is complete.
Should I use both barbell and dumbbell rows?
Only when you can state what the second version adds. Equipment access or a deliberate programme choice can be a reason. Variety by itself is not an explanation.
References
- Forte public exercise pages and the PPL programme page, accessed 26 August 2026.